COOPERATION MODEL
ARTIFICIAL INTELLIGENCE
PRODUCT ENGINEERING
DevOps & Cloud
LOW-CODE/NO-CODE DEVELOPMENT
INDUSTRY
FRONTEND DEVELOPMENT
CLOUD DEVELOPMENT
MOBILE APP DEVELOPMENT
LOW CODE/ NO CODE DEVELOPMENT
EMERGING TECHNOLOGIES


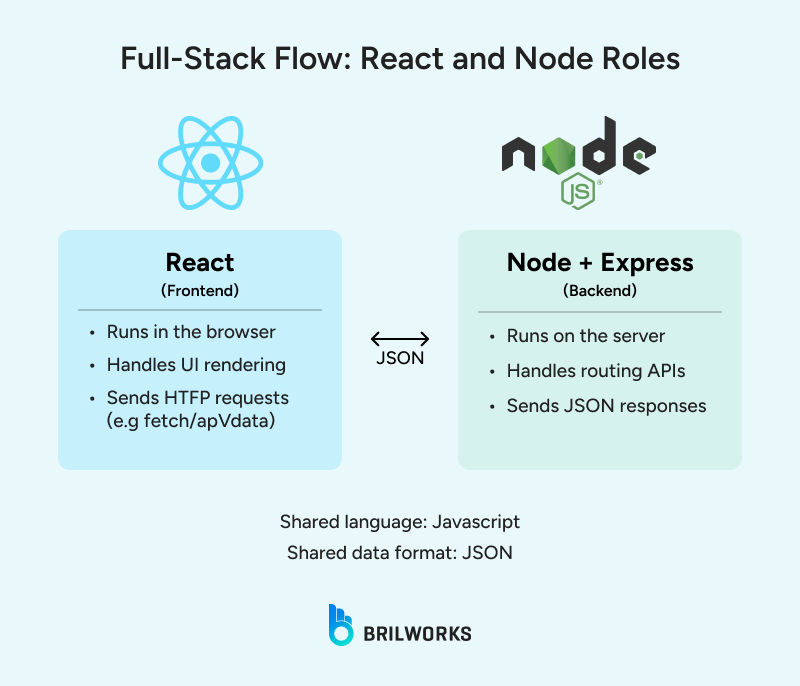
React & Node make it simple to build Full-Stack Applications. First, they both use JavaScript. Second, JSON is a common data format; both Node and React work well with it. This means that developers do not have to switch between various languages when going back and forth from frontend to backend development. React is well-known for developing interactive user interfaces, while Node is used for writing back-end server logic and APIs.
Also, since developers will often reuse code and often rely on similar patterns across the Frontend, Full-Stack, and Back-end, the amount of work to be done will be faster and more consistent. Node can handle multiple incoming requests simultaneously and without blocking, just like how React can provide updates to the UI without causing a complete redraw of the UI.
Because this stack has been battle-tested by companies such as PayPal, Airbnb, and Facebook, it is a great technology stack for developing real-world products.

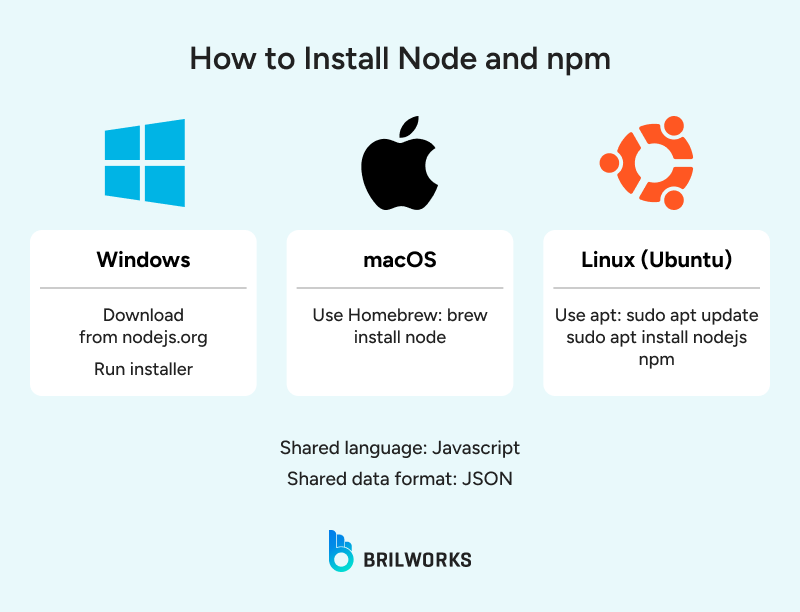
To get started building with React and Node, you will need to install Node.js first. It's packaged with npm, which you will use to install libraries.
On Windows or MacOS, the simplest way is to download it directly from nodejs.org.
Choose the LTS version; this is more stable for most projects. If you are on Linux, you can install Node.js using a package manager like apt or yum.
If you are using Ubuntu, you can install it using the command line:
sudo apt update

sudo apt install nodejs npm
If you're using macOS with Homebrew:
brew install nodeIn case you are managing multiple versions of Node, you can use nvm (Node Version Manager). With this, you can comfortably switch between different versions.
Requirement: Node 18 or higher
You will need Node 18 or higher version; otherwise, you may have compatibility issues with React, especially if you are using the latest React version. You can confirm which version you are using by running the following commands:
node -v

npm -v
You should see version numbers in the output. For example:
v18.18.0

9.8.1
If you are getting some kind of error, it means the install path isn’t set correctly. Here's what you can do to fix it. Try to restart your terminal or check your environment variables in your system.
To make sure everything is working, you can start by creating a simple Node file:
echo "console.log('Node is working')" > test.js

node test.js
If it prints the message, your setup is ready for building with React and Node.

To build the user interface of your full-stack app, you need a React project set up with all required tooling out of the box.
npx create-react-app my-fullstack-app

cd my-fullstack-appYou will need to setup version control to track changes, collaborate, and revert if something goes wrong. Git is essential from day one.
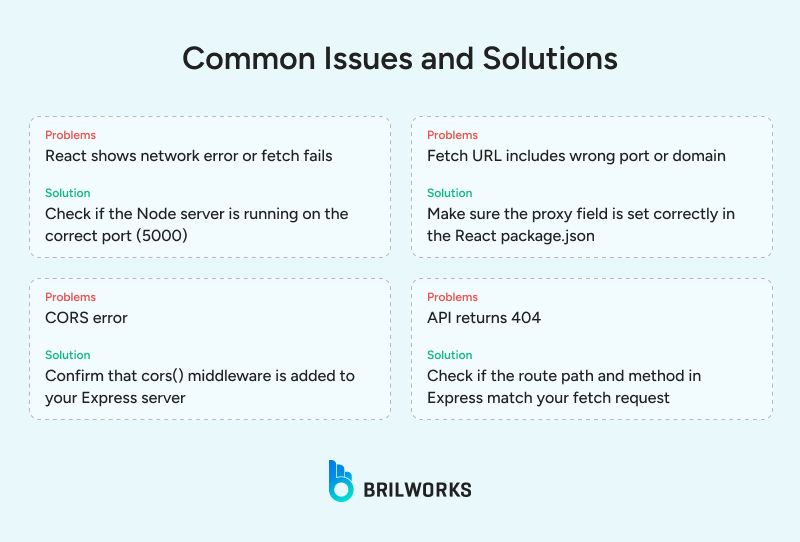
As you are developing, React will run on port 3000 while your Node.js backend on port 5000. If you don't proxy, then API calls from React to your backend will have CORS issues.
Set Up Proxy in package.json
Add this line to your React app’s package.json:
"proxy": "http://localhost:5000"
In this project, we are going to use Express, which you can install using npm:
npm install expressExpress is the main part of the server in most standard React and Node configurations. It takes care of routing, API requests, and middleware. You also want some other useful modules:
npm install cors body-parser- `cors` to enable communication with backend
- `body-parser` to read data from incoming requests
Create a file called `server.js` or `app.js` in the project root or in a new backend folder.
const express = require('express')

const cors = require('cors')

const app = express()

const port = process.env.PORT || 5000

app.use(cors())

app.use(express.json())

app.get('/api/hello', (req, res) => {

res.json({ message: 'Hello from the server' })

})

app.listen(port, () => {

console.log(`Server running on port ${port}`)

})You can test if the server is working. To do so, you can run the following command in the terminal.
node server.jsThen test the endpoint.
curl http://localhost:5000/api/helloYou should see:
{"message":"Hello from the server"}
Or use a tool like Postman. Enter the URL `http://localhost:5000/api/hello`, choose GET, and click Send. You should see the same JSON response.
If it works, your Node and Express backend is ready to talk to your React frontend.
Now, you will have to establish a connection between React and Node. In this section, we will know how to setup routes and fetch data in Express server.
Define clear API routes for common actions. Here's an example;
const express = require('express')

const app = express()

app.use(express.json())

let data = [

{ id: 1, name: 'Item One' },

{ id: 2, name: 'Item Two' }

]

app.get('/api/data', (req, res) => {

res.json(data)

})

app.post('/api/data', (req, res) => {

const newItem = { id: Date.now(), ...req.body }

data.push(newItem)

res.status(201).json(newItem)

})

app.put('/api/data/:id', (req, res) => {

const itemId = parseInt(req.params.id)

const index = data.findIndex(item => item.id === itemId)

if (index === -1) return res.status(404).json({ error: 'Item not found' })

data[index] = { ...data[index], ...req.body }

res.json(data[index])

})

app.delete('/api/data/:id', (req, res) => {

const itemId = parseInt(req.params.id)

const index = data.findIndex(item => item.id === itemId)

if (index === -1) return res.status(404).json({ error: 'Item not found' })

data.splice(index, 1)

res.json({ message: 'Item deleted' })

})
In this example, the server accepts requests to fetch, add, update, or delete items. It handles basic validation like checking if the item exists.
API Endpoints Table
|
Endpoint |
HTTP Method |
Purpose |
Request Body |
Response |
|
/api/data |
GET |
Fetch data |
None |
JSON data array |
|
/api/data |
POST |
Create new data |
JSON object |
Created object with ID |
|
/api/data/:id |
PUT |
Update data |
JSON object |
Updated object |
|
/api/data/:id |
DELETE |
Delete data |
None |
Success message |
Inside a React component, use fetch to call your Node API. Here’s a complete example:
import { useState, useEffect } from 'react'

function DataComponent() {

const [data, setData] = useState(null)

const [loading, setLoading] = useState(true)

const [error, setError] = useState(null)

useEffect(() => {

fetch('/api/data')

.then(response => {

if (!response.ok) throw new Error('Failed to fetch data')

return response.json()

})

.then(data => {

setData(data)

setLoading(false)

})

.catch(err => {

setError(err.message)

setLoading(false)

})

}, [])

if (loading) return <p>Loading...</p>

if (error) return <p>Error: {error}</p>

if (!data || data.length === 0) return <p>No data available</p>

return (

<ul>

{data.map(item => (

<li key={item.id}>{item.name}</li>

))}

</ul>

)

}
This component fetches data from your Node backend on page load. It handles loading and error states and shows the data in a list. The proxy you added in package.json ensures these requests go to the Node server during development.
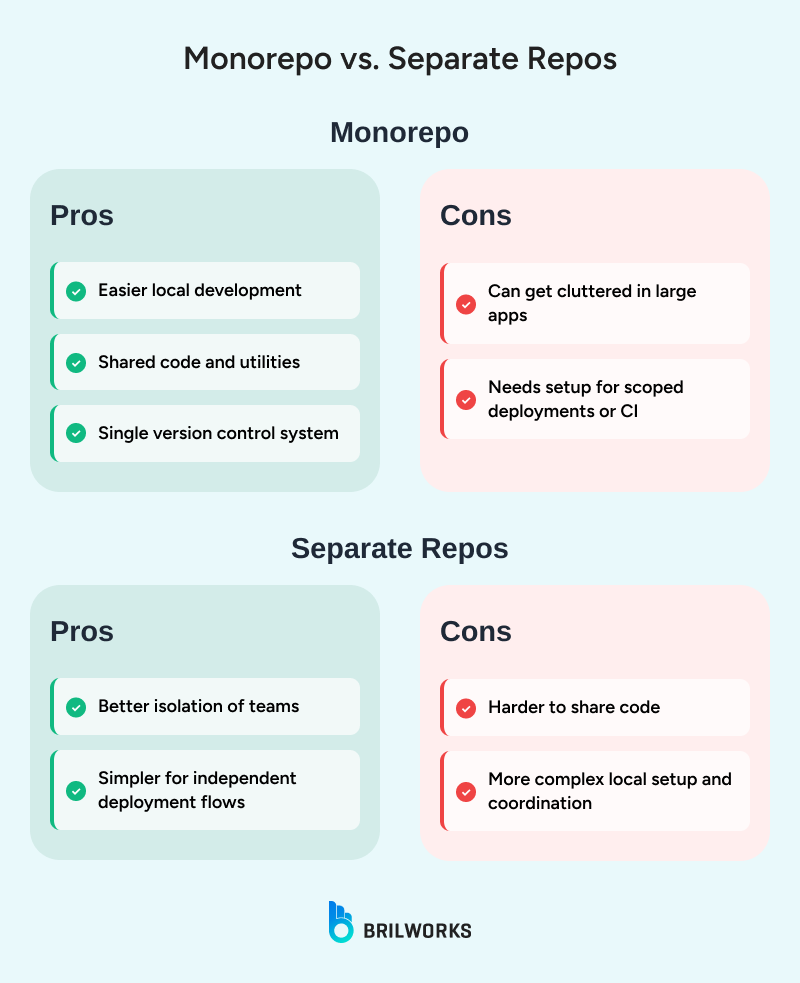
When starting a full-stack project using React and Node, the organization of your files is imperative to make your codebase manageable. You can maintain a single repository with the front and back end together (monorepo) or have separate repositories. You're right either way, you will need to decide what is best depending on your team size, how the app is deployed, and how much of the code is shared between the front and back end.

You can organize by type (e.g., controllers, routes, components) or by feature (e.g., user, dashboard, auth). For smaller projects, type-based works fine. For larger apps, feature-based tends to scale better since it keeps related files together.
Store shared config files like .eslintrc, prettier.config.js, or package.json (in the root for monorepo). Each side can also have its own package.json in the client and server folders.
Use .env.development, .env.production, etc., in both frontend and backend. Don’t forget to add .env to .gitignore. React-specific variables must begin with REACT_APP_ to be accessible in the browser.
To start the Node backend, run this from the server directory:
node server.jsDuring development, use nodemon to automatically restart the server when files change:
npm install --save-dev nodemon

Then update the package.json in your server folder:

"scripts": {

"start": "node server.js",

"dev": "nodemon server.js"

}

Now run:

npm run dev
This keeps the server running and updates it as you save changes.
To start the frontend, move to the client directory and run:
npm startThis runs the React app on http://localhost:3000.
React will forward any unknown requests (like API calls) to your Node backend because of the proxy field in client/package.json:
"proxy": "http://localhost:5000"
This setup lets you use paths like /api/data in React without hardcoding the full backend URL.
To check if both frontend and backend are working together:
Open the browser and visit http://localhost:3000
Use developer tools → Network tab to inspect API calls
If the backend route /api/hello works, it should return a JSON message in the browser

Once the requests from React are reaching Node and returning data correctly, your full stack setup is ready.
In a full-stack app using React with Node, authentication is usually handled using token-based auth with JWT or session management.
With JWT, the server generates a token after login, and the client stores it (often in localStorage or cookies) and includes it in each request. In session-based auth, the server keeps session info and uses cookies to identify users.
A user will fill out a signup form and submit it. React will send that data to the Node backend service, which will then save the user information in a database (after hashing the password with a library like bcrypt).
React sends the login credentials to the backend where it checks if valid and creates a JWT and returns to the client side. The client stores the token for later use.
On the backend, the middleware code checks the request for a valid token before processing any protected request. On the client side, the components check for the presence of a token and block the request if the user isn't authenticated.
Logging out usually clears the token from storage. If needed, the server can keep a token blacklist to invalidate tokens before they expire.
Here’s how to send data from a form in React to a Node backend and validate it properly.
React Component (Client)

import { useState } from 'react'

function ContactForm() {

const [formData, setFormData] = useState({ name: '', email: '' })

const [error, setError] = useState(null)

const [success, setSuccess] = useState(null)

const handleChange = (e) => {

setFormData({ ...formData, [e.target.name]: e.target.value })

}

const handleSubmit = (e) => {

e.preventDefault()

setError(null)

setSuccess(null)

fetch('/api/contact', {

method: 'POST',

headers: { 'Content-Type': 'application/json' },

body: JSON.stringify(formData)

})

.then(res => {

if (!res.ok) throw new Error('Submission failed')

return res.json()

})

.then(data => setSuccess('Message sent'))

.catch(err => setError(err.message))

}

return (

<form onSubmit={handleSubmit}>

<input name="name" value={formData.name} onChange={handleChange} required />

<input name="email" value={formData.email} onChange={handleChange} required />

<button type="submit">Submit</button>

{error && <p>{error}</p>}

{success && <p>{success}</p>}

</form>

)

}

Node Backend (Server)

app.post('/api/contact', (req, res) => {

const { name, email } = req.body

if (!name || !email) {

return res.status(400).json({ error: 'Missing fields' })

}

// Optional: email format check or further validation

// Save to DB or process here

res.status(200).json({ message: 'Message received' })

})To prepare your React app for production, run the following from the client directory:
npm run buildThis creates a build folder with optimized static files: minified JavaScript, CSS, and HTML.
To serve this from the Node.js backend, you can add this to your server.js after defining all API routes:
const path = require('path')

app.use(express.static(path.join(__dirname, 'client/build')))

app.get('*', (req, res) => {

res.sendFile(path.join(__dirname, 'client/build', 'index.html'))

})
This ensures all unmatched routes fall back to the React app. This setup works well in production where both frontend and backend are served from the same server.
You can deploy your full-stack app to a number of platforms. Here are some common options and basic steps for each:
|
Hosting Option |
Summary |
Setup Highlights |
|
Heroku |
Easy to set up and manage. Suitable for small projects or MVPs. |
Push code to a Git repo, add build scripts, set environment variables in the dashboard. Use a single Procfile to run both frontend and backend. |
|
AWS (EC2 or Elastic Beanstalk) |
Flexible and scalable. Works for high-traffic apps. |
Requires setting up EC2 or EB instance, installing Node, configuring nginx or reverse proxy. You control everything, including security groups and storage. |
|
Vercel or Netlify (Frontend) + Render or Railway (Backend) |
Good for JAMstack-style apps. Split frontend and backend deployment. |
Deploy React separately from Node. Vercel/Netlify handles frontend, backend goes to platforms like Render. Configure CORS properly between the two. |
|
DigitalOcean |
Offers more control than Heroku, simpler than AWS. |
Use a droplet to host both parts. Set up reverse proxy using nginx. SSH access allows direct deployment and server management. |
Each platform offers trade-offs. Heroku is fast to launch with minimal setup but may get expensive with scaling. AWS suits enterprise needs but takes time to configure. Vercel with a separate backend works well for apps that don't need a single server origin. DigitalOcean offers a balance of control, cost, and simplicity.
See Also: Bringing AI into Your Node.js Projects? What You Need to Know
Building full-stack applications using React with Node.js gives teams a consistent, efficient way to handle both frontend and backend using a single language. React manages the user interface, while Node handles server-side logic and APIs. Together, they simplify data handling, improve developer productivity, and support scalable web architectures.
Brilworks helps businesses build and maintain full-stack applications with this setup. Our team understands how to structure codebases for long-term maintainability and performance. We also bring deep experience in AWS consulting and cloud infrastructure optimization, which helps scale applications reliably as usage grows.
For projects involving advanced features, Brilworks can integrate generative AI capabilities into your React and Node stack. This allows you to add intelligent features without overhauling your system.
If you're looking to build or scale your product, talk to us to hire NodeJS developer and cloud consulting experts who can support your goals with practical, reliable solutions.
Modern React and Node.js applications can leverage AI through libraries like TensorFlow.js on the frontend or API-based AI services connected through your Node.js backend.
MongoDB pairs naturally with React and Node.js (forming the MERN stack), but SQL databases like PostgreSQL or MySQL can also be effectively integrated through Node.js ORMs like Sequelize or TypeORM.
File uploads in React and Node.js applications typically use multipart/form-data requests with libraries like Multer on the Node.js side and FormData objects in React components.
Yes, the same Node.js backend that serves your React web application can be used with React Native mobile apps, allowing for code sharing and consistent API design across platforms.
Get In Touch
Contact us for your software development requirements
Get In Touch
Contact us for your software development requirements