COOPERATION MODEL
ARTIFICIAL INTELLIGENCE
PRODUCT ENGINEERING
DevOps & Cloud
LOW-CODE/NO-CODE DEVELOPMENT
INDUSTRY
FRONTEND DEVELOPMENT
CLOUD DEVELOPMENT
MOBILE APP DEVELOPMENT
LOW CODE/ NO CODE DEVELOPMENT
EMERGING TECHNOLOGIES


Building iOS apps on Windows might sound complex since Apple keeps iOS development exclusive to Mac (Xcode only works on macOS). But with the right tools and a bit of creativity, you can develop iOS apps on Windows, too. This guide shows you working methods to make iOS development possible on the Windows platform. Let's walk through how to develop iOS apps on Windows using cross-platform options, cloud-based Mac services, and virtualization.

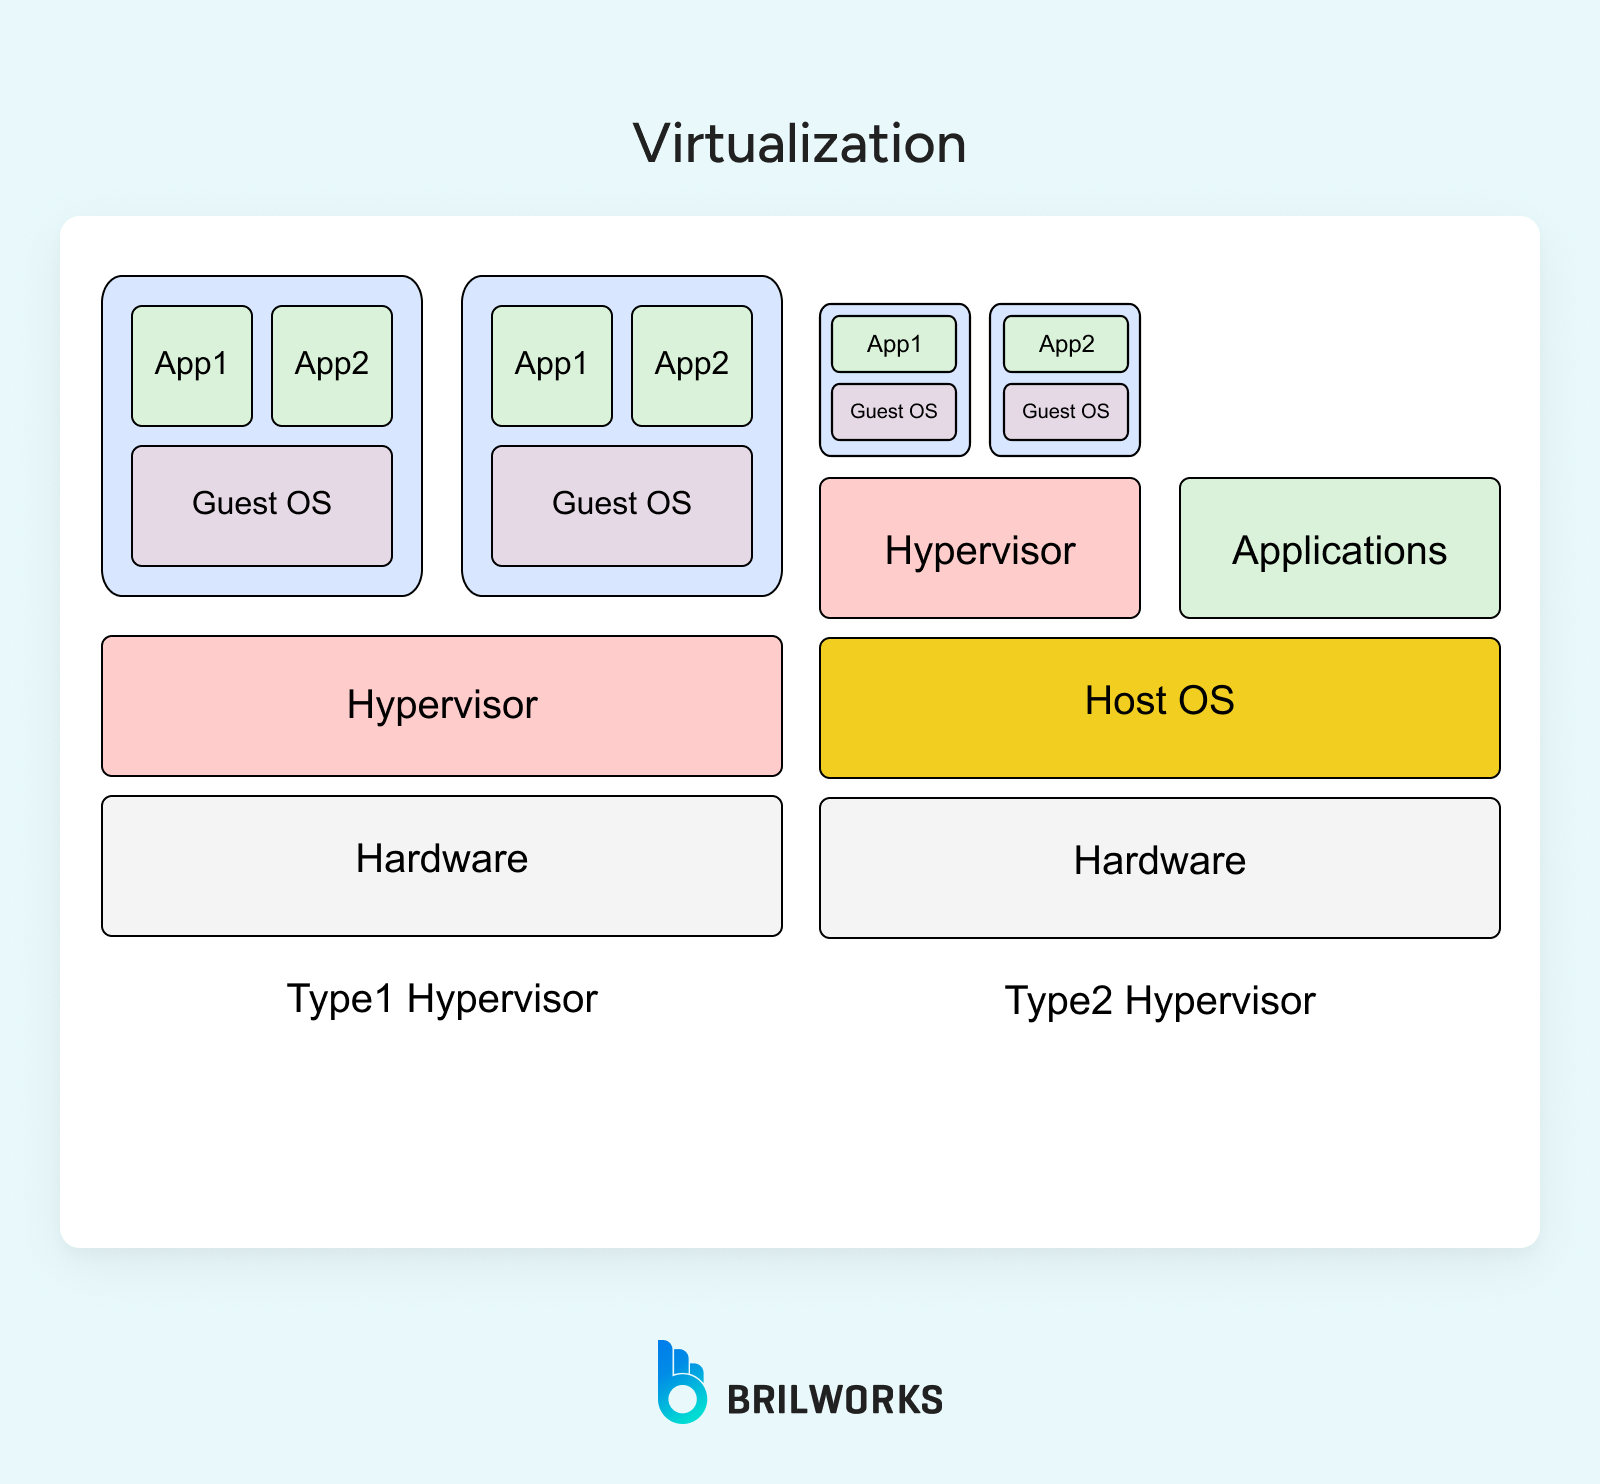
Virtualization lets you run macOS on a Windows PC. It is the process that enables a virtual environment where Xcode can operate as if on a Mac. With virtualization, you can run different OS on the Windows platform. VirtualBox and VMware Workstation (paid) are popular options for this. With these tools, you can run Xcode and develop iOS apps on Windows. Here's a quick guide on how you can set up a virtual machine.

How to set up a virtual machine
Install VMware Workstation Player or VirtualBox. Now you have to download a macOS installer from the Mac App Store on a Mac (if available) or use a recovery image from Apple's support site. Alternatively, you can also get a pre-built macOS .iso from a trusted source.
Apple's EULA prohibits running macOS on non-Apple hardware, so virtualization may breach terms of service. For personal projects, this is often overlooked, but commercial developers should consult legal advice or opt for cloud-based solutions.
If you have a .dmg file, convert it to .iso using tools like dmg2img or an online converter. After this step, you will need to tweak of VirtualBox for MacOS.
Run these commands in Command Prompt (as administrator):
cd "C:\Program Files\Oracle\VirtualBox"
VBoxManage setextradata "YourVMName" "VBoxInternal/Devices/efi/0/Config/DmiSystemProduct" "iMac19,1"
VBoxManage setextradata "YourVMName" "VBoxInternal/Devices/efi/0/Config/DmiSystemVersion" "1.0"
VBoxManage setextradata "YourVMName" "VBoxInternal/Devices/smc/0/Config/DeviceKey" "ourhardworkbythesewordsguardedpleasedontsteal(c)AppleComputerInc"
VBoxManage setextradata "YourVMName" "VBoxInternal/Devices/smc/0/Config/GetKeyFromRealSMC" 1
Replace "YourVMName" with the name of your VM.
Now install Xcode and create a project to get started.
You can rent the Mac in the cloud as an alternative to virtualization. Services like MacStadium, MacinCloud, and XcodeClub provide remote access to macOS systems pre-installed with Xcode, accessible via Remote Desktop Protocol (RDP) from your Windows PC.
It is the most recognized tool for cloud-based Mac access. It offers flexible pricing, ideal for those who are just starting out. It gives access to a wealth of iOS development tools such as Xcode, Visual Studio, Xamarin, Flutter, Ionic, and Cordova. You can use eGPU for graphic-intensive tasks. It is widely praised for ease of use to beginners.
Many users reported lag in RDP connection and slow simulator performance. Support can be slow, sometimes taking days to respond. Overall, this is an excellent tool for building iOS on Windows
It is popular in enterprise development, offering dedicated hardware such as Mac Minis, Mac Pros, and iMac Pros. It supports fast cloning. It supports Jenkins and GitHub Actions for automated builds. You will find the pre-installed Xcode. Many users find it a costlier option.
Plus, features like Orka may make users feel overwhelmed. For affordability, MacinCloud’s pay-as-you-go plan (~$1/hour) or XcodeClub’s budget-friendly plans (~$25/month) are better options. If you want a simpler option, then XCodeClub is a great option.
XcodeClub, while praised for its performance and customer service, has a smaller footprint, with fewer mentions and a niche following, often highlighted for its affordability and responsiveness. It is a lightweight and simple-to-use platform for iOS development.
Talking about its features, with all the plans, it gives you admin rights. This means you can install any SDK or software. Moreover, TeamViewer-Based RDP is an excellent option to start, monitor, or shut down virtual Macs. Tools like Xcode Flutter are supported by XCodeClub.
For iOS development on Windows, MacinCloud is the most accessible entry point but struggles with performance and restrictions. XcodeClub excels in speed, affordability, and flexibility, which is ideal for solo developers needing control. MacStadium is best for teams or enterprise-grade stability but comes at a premium. Test each service’s trial to match your needs, especially if simulator performance or admin access is critical.
React Native, backed by Meta, is one of the most popular frameworks for building iOS apps. Big names like Pinterest, Walmart, and Shopify use it because it's fast and efficient. Since it's based on JavaScript and React, web developers can easily pick it up to build apps that feel native. It provides a strong ecosystem for building cross-platform apps.
Quick development, tons of third-party libraries, and the ability to use one codebase for both iOS and Android are benefits of using it. You also get features like hot reloading for instant updates, and you don't need a Mac to get started.
If you're on Windows, here's how to begin:
Install Node.js, the React Native CLI, and Expo CLI.
Then, create your app using npx react-native init MyApp, and use the Expo Go app to test it on iOS.
It's a great way to build quality iOS apps while using your web development skills.
Flutter, backed by Google, is another popular framework for building iOS apps on Windows. It powers millions of apps worldwide, including Google Ads, eBay, Alibaba, SpaceX, and many others. It's built with Dart, a language that is used to create great UIs.
Flutter is rich in features with a huge widget library and hot reload. You can build pixel-perfect UIs and use the same code for both iOS and Android. Perfect one, if you care about both speed and design. It also performs well and supports tools like Codemagic, which lets you build and test iOS apps in the cloud. Windows users can use Flutter to build iOS apps.
If you're using Windows, here's how to get started:
Install the Flutter SDK and Visual Studio Code,
Run flutter create my_app, and use flutter run or Codemagic for testing your app on iOS.
Flutter makes it easy to build sleek, efficient apps that feel right at home on any device.
Xamarin, a Microsoft product, is a popular iOS development option. Apps like Alaska Airlines and millions of others have been built with this framework. It works well with the .NET ecosystem. It uses C#, so if you're already familiar with .NET, it's an easy transition to building native iOS apps.
It is tightly integrated with Visual Studio and gives you access to native iOS APIs. It compiles down to native code. It means you can build native-like apps and share a lot of code across iOS and Android. It is generally used for enterprise-level projects.
For developers, it provides a wealth of features for debugging and development. If you're on Windows, getting started is simple: install Visual Studio with the Xamarin plugin and create a Xamarin.Form a project and pair it with a Mac to handle iOS builds through Visual Studio. Xamarin gives .NET developers the tools to build high-performance iOS apps without switching tech stacks.
Swift Sandbox is an online IDE that lets you write and run Swift code directly in your browser. It sends your code to a remote server for compilation and then returns the output, making it simple and accessible for beginners. While it's not suitable for building full iOS apps, it's great for learning Swift syntax, testing small code snippets, and experimenting without needing any local setup.
Swift for Windows allows you to build and run Swift code on a Windows machine using the Swift 5.6.1 toolchain. After downloading and installing it, you can write Swift programs and use Visual Studio for editing, compiling, and debugging. While it doesn't support native iOS development, it's useful for creating console apps, learning the language, or developing cross-platform projects with Swift.
Using Visual Studio with a Swift plugin lets you write Swift code on Windows, but to compile iOS apps, you need to connect it to a Mac build host. This setup allows you to develop in a Windows environment while offloading the iOS compilation to a Mac, since Apple's build tools only run on macOS. It's a practical option for teams using Windows who still want to work with Swift for iOS development.
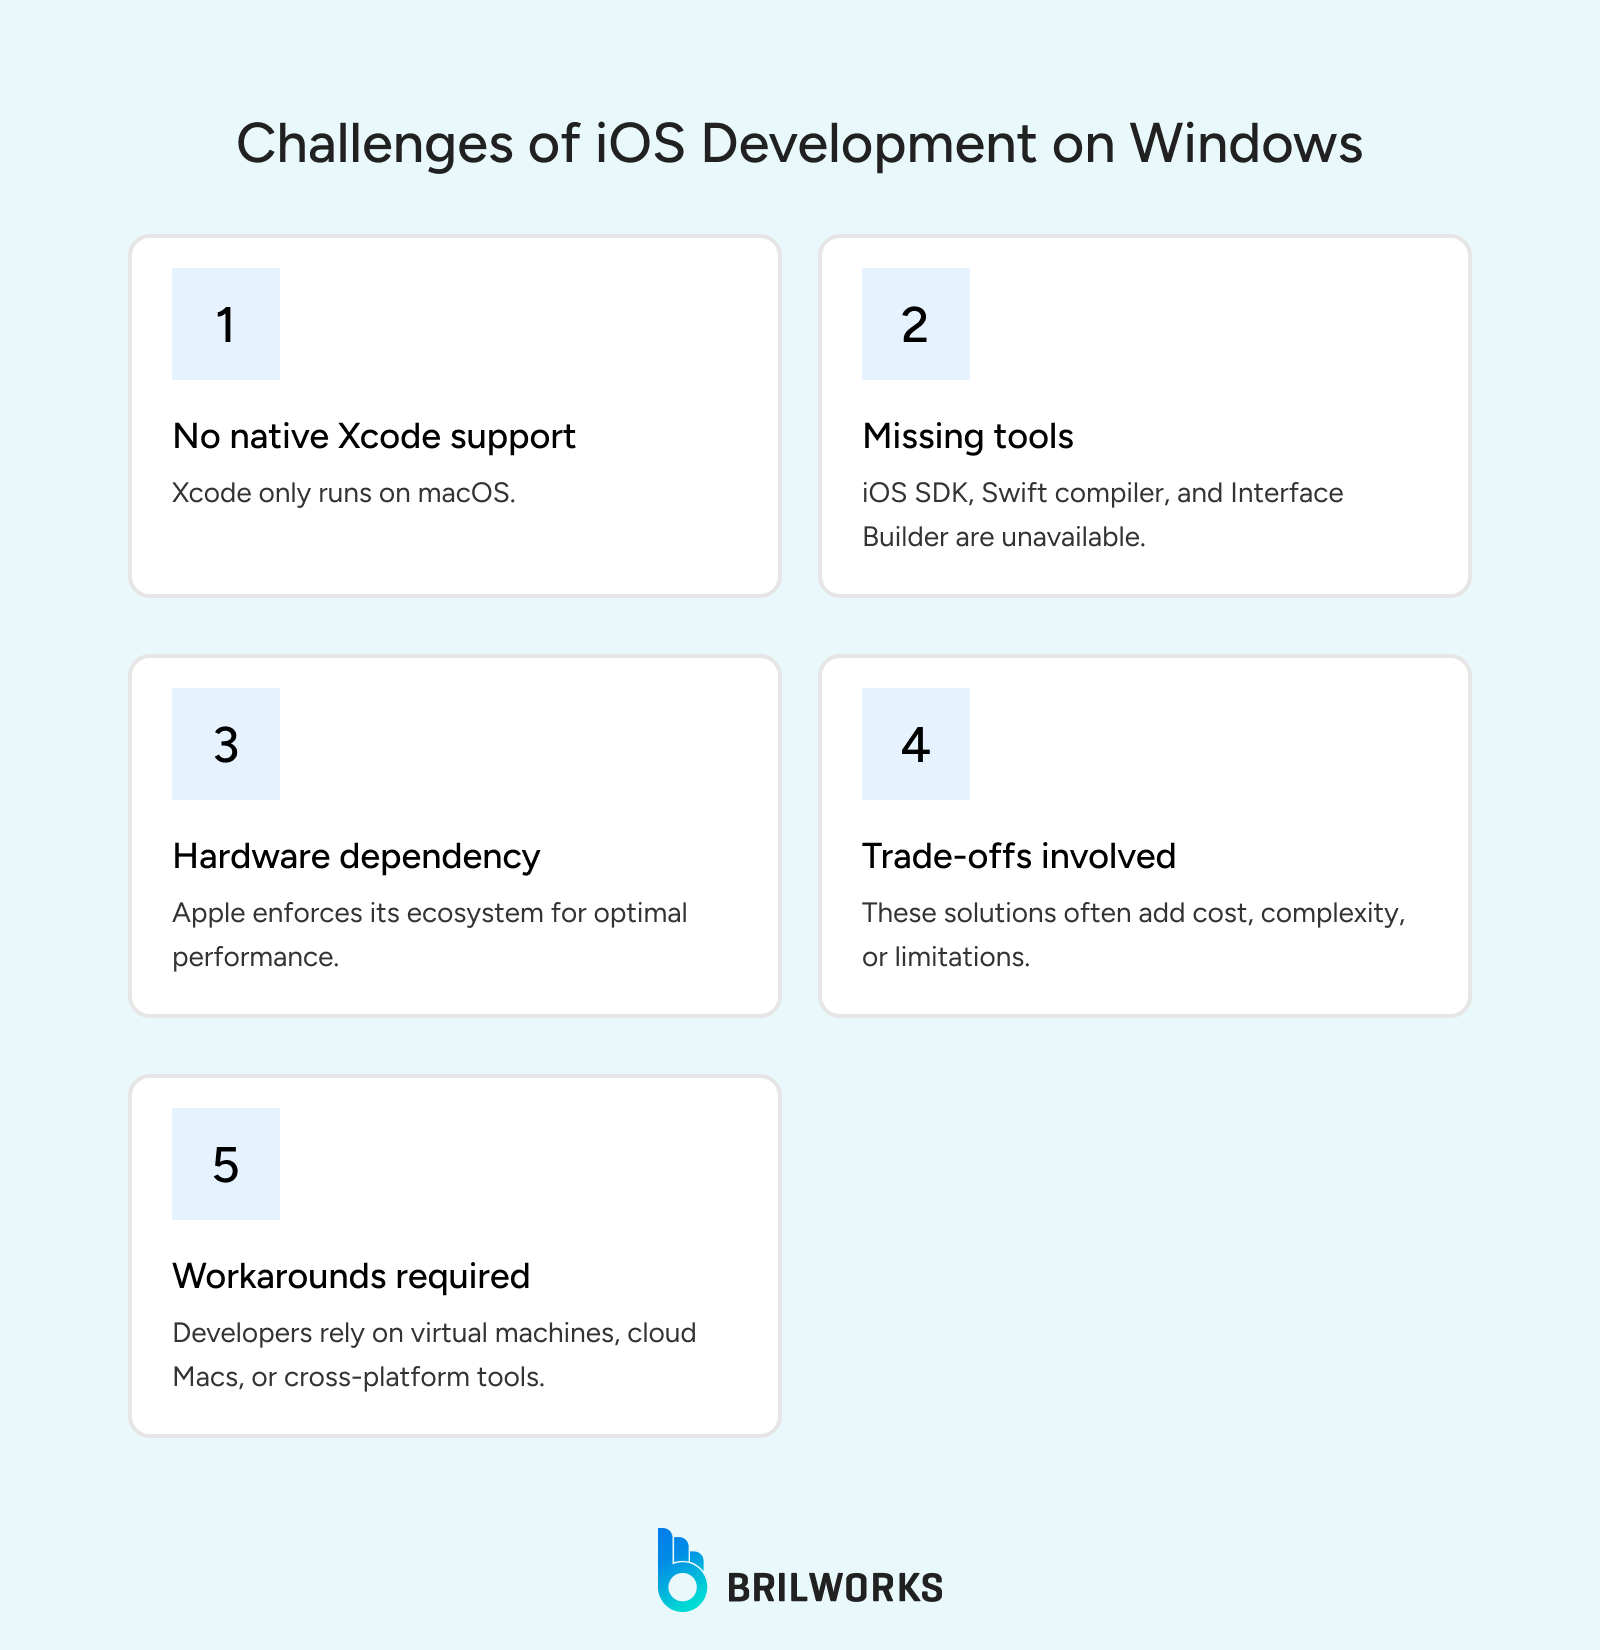
Xcode is exclusively made for macOS. It comes with everything you need to build iOS apps, like the iOS SDK, Swift compiler, Interface Builder, and tools for submitting to the App Store. Apple keeps it exclusive to its own ecosystem, so developers use Apple hardware and software together for the best performance.
That said, if you're on Windows, you're not completely out of luck. While you can't install Xcode or the iOS SDK directly, there are workarounds like using virtual machines, cloud-based Mac services, cross-platform tools, or Swift packages. These options all come with trade-offs.

If you're building iOS apps on Windows, there are a few smart practices that'll make your life easier and your apps better.
Start by using version control tools like Git. It helps you track changes and collaborate easily, especially if you're switching between Windows and macOS. Also, try to automate builds using tools like Codemagic—it works well with Flutter and React Native and saves you a lot of manual work.
Don't rely only on simulators. Mix in emulators, cloud-based testing platforms like BrowserStack, and actual devices when you can. This way, your app performs well for all users, not just under ideal test conditions.
Familiarize yourself with Apple's design guidelines to build smooth, user-friendly interfaces. Also, keep in mind that submitting apps to the App Store still requires a Mac. So plan for that step, even if your main development happens on Windows
iOS development tools move fast. Keep an eye on updates to React Native, Flutter, and even Swift support for Windows. Staying current helps you take advantage of new features and stay compatible.
These habits will help you build high-quality iOS apps from a Windows setup.
When it comes to developing iOS apps on Windows, there's no one-size-fits-all answer. The best approach depends on your budget, experience, and the complexity of your project.
Virtualization is a solid option for solo developers with strong technical skills and powerful PCs. It gives you full access to Xcode, which is essential for native development—but setup can be tricky and performance may vary.
If you're part of a team or want a plug-and-play solution, renting a cloud-based Mac is a convenient and legal option. It's perfect for projects that need frequent App Store submissions without the hassle of physical hardware.
Frameworks like Flutter, React Native, and Xamarin are great for startups or indie devs aiming to target both iOS and Android. They're especially useful if you already know JavaScript, Dart, or C#.
If you're just exploring Swift or working on smaller apps, Swift for Windows is a good place to start. But it's not ideal for full-scale iOS development.
Developing iOS apps on Windows is not only possible but increasingly viable in 2025, thanks to virtualization, cloud services, cross-platform frameworks, Swift tools, and emulators. By choosing the right approach, whether it's running Xcode via a virtual machine, renting a cloud Mac, or using React Native, you can create apps that captivate iOS users without breaking the bank. Each method has its strengths, so align your choice with your skills, budget, and project needs.
To wrap it up:
If you're serious about mobile app development on Windows, start small, test often, and scale with the setup that matches your workflow best.
Ready to take the next step? Explore one method that fits your style and test it out. You might be surprised how much you can accomplish without a Mac.
Get In Touch
Contact us for your software development requirements
Get In Touch
Contact us for your software development requirements