COOPERATION MODEL
ARTIFICIAL INTELLIGENCE
PRODUCT ENGINEERING
DevOps & Cloud
LOW-CODE/NO-CODE DEVELOPMENT
INDUSTRY
FRONTEND DEVELOPMENT
CLOUD DEVELOPMENT
MOBILE APP DEVELOPMENT
LOW CODE/ NO CODE DEVELOPMENT
EMERGING TECHNOLOGIES


![How-to-Build-an-MVP-with-React-Native-[A-Guide-for-Startups]-banner-image](https://d14lhgoyljo1xt.cloudfront.net/assets/Banner_Image_-_How_to_Build_an_MVP_With_React_Native_1-1749030695977.webp)
Launching a new product is exciting, but also risky. Startups often struggle with the same dilemma: how to validate their idea quickly without burning through time and resources.
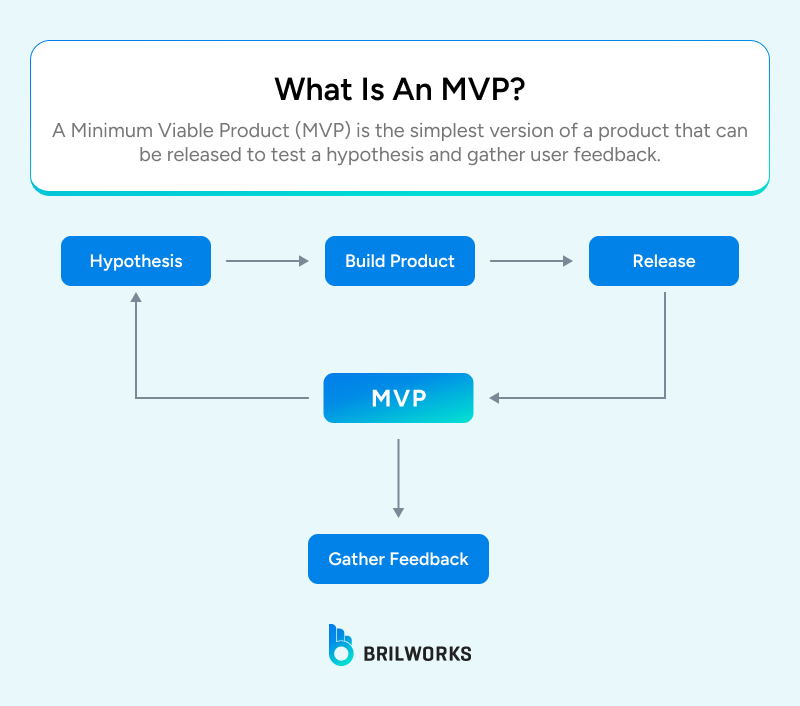
That is where an MVP, or minimum viable product, becomes essential. An MVP allows you to test your concept with just enough features to satisfy early users while gathering feedback for improvements.

React Native has emerged as one of the most practical choices for rapid MVP development. It lets teams build cross-platform apps with a single codebase, cutting both costs and time to market.
In this guide, we will walk through why React Native works so well for MVPs, how startups can leverage it, the tools that make development faster, and real-world examples of companies that scaled from MVP to millions of users.
Get expert guidance and hands-on support from a react native app development company trusted by startups and enterprises for smooth, reliable releases.
Choosing the right framework is often the most critical decision when building an MVP. React Native, backed by Meta, combines the efficiency of JavaScript with native-like performance. For startups, this combination is powerful because it reduces development effort without compromising user experience.

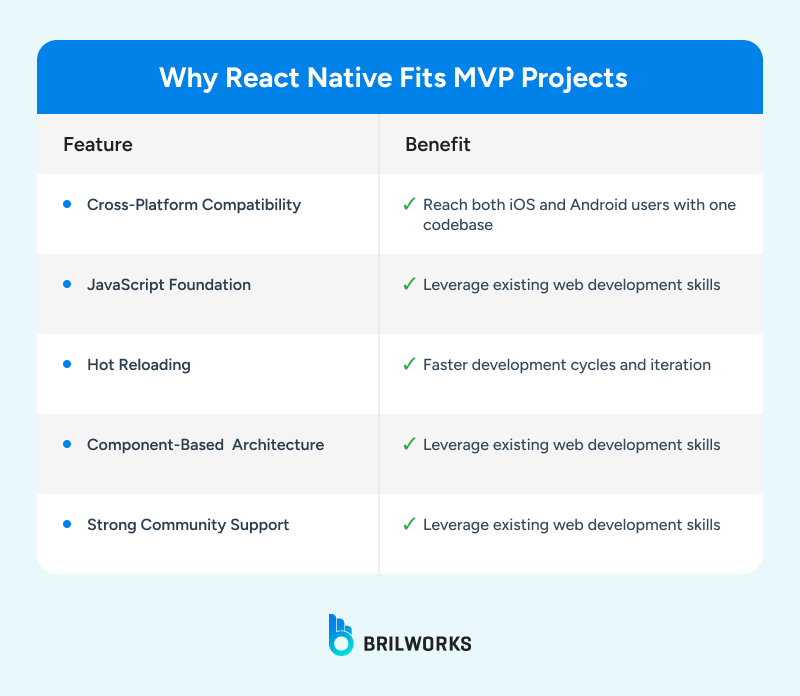
React Native fits particularly well with MVP projects for three reasons.
Speed and efficiency: Developers can reuse components across iOS and Android, which reduces repetitive work and accelerates development.
Lower costs: Building one app for both platforms cuts initial expenses, a priority for startups operating with limited budgets.
Community support: With a vast ecosystem of libraries, frameworks, and open-source contributions, React Native offers ready-made solutions to common problems.
Compared with alternatives like Flutter or pure native development, React Native strikes a balance between speed, flexibility, and long-term scalability, making it one of the top React Native app development frameworks for startups.
When building a Minimum Viable Product (MVP) with React Native, selecting the right tools can significantly speed up development, improve code quality, and enhance the overall developer experience. Below are some of the top tools and libraries commonly used in React Native MVP development:
What it is: Expo is a framework and platform for universal React applications. It comes with a set of tools, libraries, and services that help speed up the development of React Native apps.
Why it's useful: Expo simplifies React Native development by providing a managed environment, allowing you to focus on building features instead of configuring complex build tools. It also supports hot reloading and allows for easy sharing of apps via QR codes.
When to use it: Ideal for quick prototypes, MVPs, and apps that don't require complex native modules or advanced customizations.
What it is: Firebase is a Backend-as-a-Service (BaaS) platform by Google that provides essential backend features like authentication, databases, cloud storage, analytics, and more.
Why it's useful: Firebase offers pre-built features that speed up backend development, including authentication, real-time databases, and cloud storage. It's highly scalable, which makes it ideal for MVPs that need to handle user data and interactions without building a full backend from scratch.
When to use it: Perfect for MVPs that require user management, real-time data, push notifications, and cloud storage, without the need for a custom backend.
What it is: React Navigation is a flexible and customizable navigation library for React Native. It provides a simple API for handling different types of navigation in mobile apps, including stack, tab, and drawer navigation.
Why it's useful: React Navigation offers an intuitive API, extensive documentation, and customization options. It's lightweight and easy to implement, which is ideal when building an MVP quickly.
When to use it: If you need a robust navigation system without the overhead of more complex libraries like React Native Navigation.
What it is: Redux Toolkit is the official, recommended approach for writing Redux logic. It simplifies Redux by providing a set of functions that make it easier to set up a store, create reducers, and handle side effects.
Why it's useful: Redux Toolkit reduces boilerplate code, offers better type safety, and integrates with libraries like Redux-Thunk for side-effect management. It's particularly helpful in handling app state management in medium to large React Native applications.
When to use it: Use Redux Toolkit for state management when the app requires complex state logic or you need a global state that persists across screens.
What it is: Jest is a testing framework maintained by Facebook, commonly used with React and React Native applications. It supports unit testing, integration testing, and snapshot testing.
Why it's useful: Jest is easy to set up and integrates well with React Native. It allows you to test your components, reducers, and other logic efficiently. Additionally, Jest has built-in features like mocking and code coverage reports.
When to use it: Ideal for writing unit tests and ensuring the reliability of your MVP features.
What it is: React Native Paper is a high-quality, well-documented Material Design library for React Native.
Why it's useful: It provides a set of pre-built, customizable UI components that follow Material Design guidelines. This helps you build a polished and consistent UI quickly without having to design every component from scratch.
When to use it: If you want to quickly get a clean and professional-looking UI using Material Design principles, this tool is a great choice.
What it is: TypeScript is a statically typed superset of JavaScript that provides type checking at compile time.
Why it's useful: TypeScript helps catch type-related errors early in development and provides better tooling support in IDEs, improving the developer experience. It also helps with code maintainability in larger projects.
When to use it: If you're working on an MVP that may evolve into a larger project or if you simply prefer type safety during development, TypeScript is a great choice.
What it is: React Native Debugger is an open-source debugging tool that combines the Chrome DevTools with Redux DevTools.
Why it's useful: It offers features like inspecting the app's UI, network requests, and Redux state in a single, unified interface. It’s a powerful tool for tracking down bugs and optimizing performance in React Native apps.
When to use it: Essential for debugging and inspecting your app, especially when dealing with Redux state and complex app flows.
What it is: Lottie is an open-source library for rendering animations in React Native using JSON-based animations.
Why it's useful: Lottie allows you to easily add high-quality animations without a performance hit, helping make your MVP visually engaging and interactive.
When to use it: Perfect for apps that require rich animations, like onboarding screens, button interactions, or loading indicators.
What it is: Fastlane is an automation tool for building and deploying iOS and Android apps. It streamlines the process of managing app builds, screenshots, beta distribution, and releases.
Why it's useful: Fastlane reduces the time spent on manual processes like app signing, building, and releasing, which is especially useful when iterating quickly on an MVP.
When to use it: Use Fastlane if you're ready to automate your deployment pipeline and want to release your MVP to the App Store or Google Play quickly.
Why it’s great for MVPs: Combines the flexibility of Node.js with a robust framework (NestJS) that accelerates development. Its modular architecture is ideal for quick iterations, and TypeScript provides a solid structure.
Why it’s great for MVPs: Supabase offers a fully open-source backend solution that includes authentication, a Postgres database, and real-time subscriptions—all of which can be set up with minimal configuration. It’s an ideal choice for those who need a quick database setup and authentication without having to build everything from scratch.
Why it’s great for MVPs: If your MVP involves a lot of querying, Hasura's instant GraphQL API is an excellent choice. It’s particularly useful when working with relational databases and real-time data. Since it's open-source, you can fully control your setup while still benefiting from rapid development.
Why it’s great for MVPs: Strapi is an open-source Headless CMS that makes it easy to manage content, define APIs, and handle authentication. It can save time for MVPs that require content management or custom API endpoints.
Why it’s great for MVPs: Directus is another headless CMS that offers a fully customizable backend. It provides a user-friendly admin interface, so non-technical team members can manage content, making it a good choice for MVPs with content-heavy apps.
React Native is not just a framework for small experiments. Many well-known companies started with MVPs built on React Native before scaling into full-featured applications.
Instagram: Initially integrated React Native features into their existing app to test functionality.
Airbnb: Experimented with React Native during its MVP phase to accelerate development.
Uber Eats: Used React Native for its restaurant dashboard MVP.
Wix: Scaled from a React Native MVP into a widely adopted product.
These examples demonstrate how React Native supports a path from idea validation to mainstream adoption, proving its value beyond the prototype stage.
Building an MVP with React Native is not without challenges. Startups often face performance issues, limited access to certain native APIs, or difficulties when integrating advanced features.
The good news is that most of these challenges can be resolved with the right strategies:
Performance optimization: Use techniques like lazy loading and optimized images to improve responsiveness.
Bridging with native code: For features not supported out of the box, developers can write custom native modules.
Scalability concerns: Choosing the right state management approach, such as Redux or Recoil, ensures smoother scaling.
Our detailed guide on React Native debugging tools and methods covers how to troubleshoot issues effectively.
It is worth clarifying a common confusion. React is primarily used for building web applications, while React Native is focused on mobile apps. Startups searching for a React MVP website should know that React works best for browser-based products, while React Native delivers mobile experiences.
In many cases, startups begin with a React MVP for web and later expand into mobile using React Native. Both share the same foundation, so the transition between platforms is smoother.
The timeline depends on scope and complexity, but in most cases, startups can build and launch a React Native MVP within 8 to 12 weeks. Smaller projects with limited features may take even less time, especially when using tools like Expo or Firebase.
Working with an experienced React Native development service can shorten the timeline further, ensuring that best practices in performance, testing, and deployment are followed.
Startups succeed not just by having ideas, but by executing them quickly and learning from the market. React Native helps achieve exactly that by enabling rapid MVP development with a single codebase, powerful tools, and a supportive ecosystem.
Whether you are validating a new product or preparing to scale, React Native remains one of the most reliable choices for building MVPs. If you are ready to take the next step, you can explore how to hire React Native developers and bring your MVP idea to life faster.
Yes. It offers cross-platform development, faster iteration cycles, and a strong community, all of which help startups reduce risk and time to market.
For startups that prioritize speed, Firebase and Supabase are excellent. For those planning to scale early, Node.js with frameworks like NestJS is a better option.
The cost varies, but React Native typically reduces expenses by 30 to 40 percent compared with building separate native apps for iOS and Android.
Flutter is a strong alternative, but React Native has broader community adoption and an easier transition path for web developers already using React.
Get In Touch
Contact us for your software development requirements
Get In Touch
Contact us for your software development requirements