COOPERATION MODEL
ARTIFICIAL INTELLIGENCE
PRODUCT ENGINEERING
DevOps & Cloud
LOW-CODE/NO-CODE DEVELOPMENT
INDUSTRY
FRONTEND DEVELOPMENT
CLOUD DEVELOPMENT
MOBILE APP DEVELOPMENT
LOW CODE/ NO CODE DEVELOPMENT
EMERGING TECHNOLOGIES


ReactJS is one of the most popular libraries for building e-commerce platforms, used by millions of businesses worldwide, including big names like Walmart and Myntra.
Its modular setup means you can build once and use the same piece in multiple places, like a ProductCard showing up on listings, recommendations, or a wishlist. This reuse keeps things consistent and saves time.
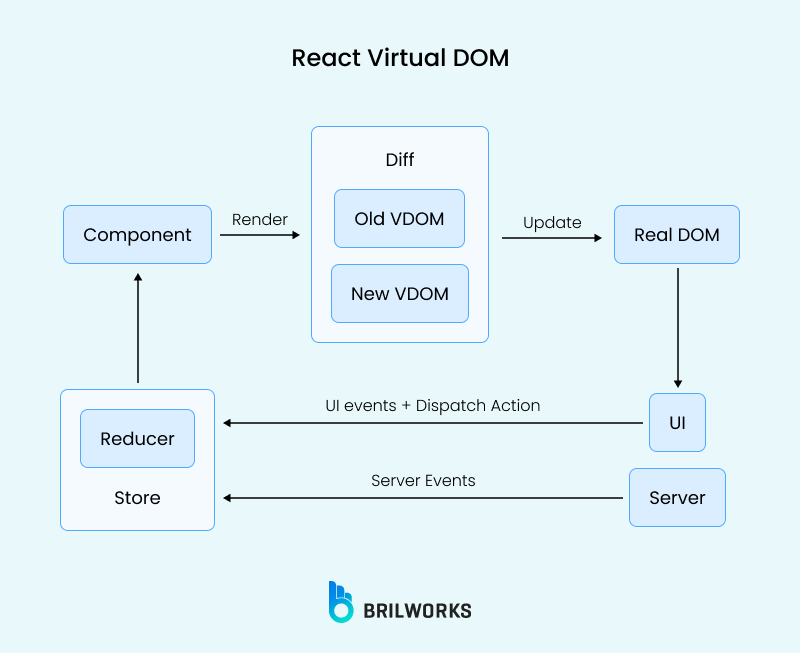
Performance is another win. React’s Virtual DOM cuts down the number of direct changes to the page, which helps when you're dealing with long catalogs or fast-changing product feeds. Pages stay quick, even with heavy content.
The broader React ecosystem adds more tools to the mix. Libraries like Redux (for managing cart and user state), React Router (for page flow), and Next.js (for server-rendered pages) fit right into ecommerce needs without requiring workarounds.
What stands out most is how React handles complexity without becoming messy. Whether it’s filters, a multi-step checkout, or real-time cart updates, you can define the interface based on what’s happening in the background, making it easier to keep things clear and predictable for users.
Speed and Performance
Component-based Architecture
Developer Efficiency
Scalability
ReactJS is an excellent option for building an e-commerce platform because of its flexibility, performance, and developer experience benefits. A component-based architecture means that ReactJS developers can build reusable pieces of UI, such as product cards, shopping carts, and checkout flows.
It also helps with development time and consistency through the platform. For example, a ProductCard is on product listings, wishlists, and recommendations. It is easier to develop and maintain the ProductCard component in the application.
The Virtual DOM enables better performance by reducing direct DOM manipulation, which is crucial for product-heavy pages, such as catalogs, that often feature hundreds of items. This allows your pages to render quickly and for users to have a smoother experience as they navigate through pages, even on dynamic pages that tend to change frequently.

React's ecosystem is complete with extensions that make library integration easy - Redux for state management, React Router for routing, Next.js for server-side rendering (helpful for SEO), etc.
The way React manages complex UI state scenarios, such as cart updates, filters, and multi-step checkout, is simple due to its declarative nature. Instead of expressing how the UI changes (typically through imperative code) when the state changes, React lets you set up what the interface should look like. When something in the app changes.
The Virtual DOM enhances rendering speed by updating elements, which means you will be able to build a platform efficient enough to quickly load large product catalogs.
Modular components, such as product displays or carts, enable the reuse and customization of code to meet the e-commerce brand's specific feature needs. Be sure to check out the popular features of React.js.
React syntax is simple, so you can reduce the development timeline
It provides a modular architecture.
The most important part of your eCommerce application is the architecture that not only impacts the development experience but also scalability. Let’s take a look at what special React provides for application developers.
|
|
Traditional Approach |
React Ecommerce Approach |
|
Page Loading |
Full page refreshes |
Component-based updates |
|
State Management |
Server-side sessions |
Client-side state with Redux/Context |
|
Product Browsing |
Multiple page requests |
Single-page application with filtered views |
|
Cart Management |
Server round-trips |
Local state with background syncing |
React emphasizes separation of concerns, isolating UI components (e.g., product cards, checkout forms) from business logic (e.g., pricing calculations, inventory checks). This modularity improves code maintainability and testing.
Another one is that one-way data binding ensures predictable data flow, where state changes propagate from parent components to children, simplifying debugging and state management. Do you want to deep dive into React components? Check out our guide on ReactJS components.
Redux is a good choice for extensive applications with complex state requirements, such as real-time updates to the inventory.
Context API is an excellent feature for smaller applications that may require simplified management of the cart, or management of users’ sessions.
API integration pushes the ecommerce solutions further as it is required for sourcing all product data, and for processing any purchases through the checkout system.
Use open REST or GraphQL APIs to fetch the product data, where libraries like Axios or Apollo Client handle the heavy lifting for you.
Enable background syncing of cart, user sessions, and any other data variables as needed to ensure there are no component sync issues, while still remaining performant.
With this architecture, you will be able to build a scalable e-commerce solution. Plus, it enhances user experience with a reactive and engaging design for all site visitors.
In this section, we will go through a brief guide on how to develop an E-commerce store with React.js.
Setting up a React ecommerce project begins with choosing a framework like Create React App or Next.js. Next.js is preferred for its built-in SEO and server-side rendering capabilities, ideal for e-commerce.
Initialize Next.js project
npx create-next-app@latest my-ecommerce-app

cd my-ecommerce-app
Install dependencies
npm install redux react-redux @reduxjs/toolkit tailwindcssInitialize Tailwind CSS
npx tailwindcss init -pFolder structure
mkdir components pages utils servicesGit setup
echo "node_modules/" > .gitignore

echo ".env.local" >> .gitignore

git init

git add .

git commit -m "Initial project setupIt is critical to build a solid product data model for an ecommerce platform. Start with a product schema with attributes such as id, name, price, category, and picture. Next, make a reusable ProductCard component to show product details across the app in a standard way.
A few examples are:
const ProductCard = ({ product }) => (

<div className="border p-4">

<img src={product.image} alt={product.name} className="w-full h-48 object-cover" />

<h3>{product.name}</h3>

<p>${product.price}</p>

</div>

);
Implement category and filtering systems using state to manage filter criteria (e.g., price, category).
Use useState or Redux to store filter states and update the product list dynamically.
For search functionality, create a search bar component that filters products based on user input, leveraging JavaScript’s filter method. Fetch product data from an API using Axios or Fetch, ensuring efficient data handling for a seamless browsing experience.
const ProductCard = ({ product }) => (

<div className="border p-4">

<img src={product.image} alt={product.name} className="w-full h-48 object-cover" />

<h3>{product.name}</h3>

<p>${product.price}</p>

</div>

);

export default ProductCard;For cart functionality, choose Context API for smaller apps or Redux for complex state management.
Redux is ideal for handling cart operations like add, remove, and update.
Define a cart reducer:
const cartReducer = (state = [], action) => {

switch (action.type) {

case 'ADD_TO_CART':

return [...state, action.payload];

case 'REMOVE_FROM_CART':

return state.filter(item => item.id !== action.payload.id);

default:

return state;

}

};
Use useDispatch and useSelector to interact with the Redux store. Persist cart data in localStorage to maintain state between sessions:
localStorage.setItem('cart', JSON.stringify(state)).Implement add/remove/update operations with buttons in the ProductCard and Cart components, ensuring real-time UI updates.
Background syncing with an API ensures data consistency across devices.
const cartReducer = (state = [], action) => {

switch (action.type) {

case 'ADD_TO_CART':

return [...state, action.payload];

case 'REMOVE_FROM_CART':

return state.filter(item => item.id !== action.payload.id);

default:

return state;

}

};

export default cartReducer;Design a multi-step checkout form with components for shipping, payment, and order review. Use libraries like react-hook-form for form validation:
import { useForm } from 'react-hook-form';

const CheckoutForm = () => {

const { register, handleSubmit } = useForm();

const onSubmit = data => console.log(data);

return (

<form onSubmit={handleSubmit(onSubmit)}>

<input {...register('address', { required: true })} placeholder="Address" />

<button type="submit">Proceed</button>

</form>

);

};
Validate fields like address and payment details using rules in react-hook-form. Create an OrderSummary component to display cart items, taxes, and totals.
Use state to manage the active checkout step, ensuring a smooth user flow from address input to order confirmation.
import { useForm } from 'react-hook-form';

const CheckoutForm = () => {

const { register, handleSubmit } = useForm();

const onSubmit = data => console.log(data);

return (

<form onSubmit={handleSubmit(onSubmit)}>

<input {...register('address', { required: true })} placeholder="Address" />

<button type="submit">Proceed</button>

</form>

);

};

export default CheckoutForm;Integrate payment gateways like Stripe or PayPal using their React libraries (@stripe/react-stripe-js). For Stripe, set up a payment form:
import { CardElement, useStripe, useElements } from '@stripe/react-stripe-js';

const PaymentForm = () => {

const stripe = useStripe();

const elements = useElements();

const handleSubmit = async event => {

event.preventDefault();

const { error, paymentMethod } = await stripe.createPaymentMethod({

type: 'card',

card: elements.getElement(CardElement),

});

if (error) console.error(error);

else console.log(paymentMethod);

};

return (

<form onSubmit={handleSubmit}>

<CardElement />

<button type="submit">Pay</button>

</form>

);

};
Test payments in sandbox mode to ensure secure handling of success and failure cases. Use webhooks to manage payment status updates.
import { CardElement, useStripe, useElements } from '@stripe/react-stripe-js';

const PaymentForm = () => {

const stripe = useStripe();

const elements = useElements();

const handleSubmit = async event => {

event.preventDefault();

const { error, paymentMethod } = await stripe.createPaymentMethod({

type: 'card',

card: elements.getElement(CardElement),

});

if (error) console.error(error);

else console.log(paymentMethod);

};

return (

<form onSubmit={handleSubmit}>

<CardElement />

<button type="submit">Pay</button>

</form>

);

};

export default PaymentForm;Create an OrderConfirmation component to display order details post-purchase. Use an OrderHistory component to list past orders, fetching data from an API. Integrate email notifications using a service like SendGrid:
import emailjs from 'emailjs-com';

const sendOrderEmail = (order) => {

emailjs.send('service_id', 'template_id', {

order_id: order.id,

customer_email: order.email,

}, 'user_id');

};
Implement order tracking by providing real-time updates via API or webhooks. Ensure the UI reflects order status changes for a transparent user experience.
import emailjs from 'emailjs-com';

const sendOrderEmail = (order) => {

emailjs.send('service_id', 'template_id', {

order_id: order.id,

customer_email: order.email,

}, 'user_id');

};

export default sendOrderEmail;-1748519668294.webp)
There are some challenges that often come to light when developing applications with React. Let’s take a look at some of the following methods.
Building a React ecommerce platform comes with challenges, but proactive solutions can mitigate them:
Large product lists can slow down rendering. Implement virtualization with libraries like react-virtualized to render only visible items.
Use pagination or infinite scroll to load products incrementally and lazy load images to reduce initial load times.
Inconsistent cart states across devices can be frustrating for users. Use optimistic UI updates to instantly reflect cart changes locally while syncing with the server in the background using APIs.
Poor mobile experiences hurt conversions. Adopt a mobile-first design with Tailwind CSS to create responsive components that ensure layouts adapt to various screen sizes.
React’s client-side rendering can hinder SEO. Use Next.js for server-side rendering (SSR) or static site generation (SSG) to pre-render product pages, improving search engine indexing.
Overcomplicated state management can slow development. Choose Context API for small apps or Redux for larger ones, ensuring state logic aligns with application scale.
Bugs are hard to ignore. Check out some practical methods and tools to debug ReactJS apps effectively. These solutions ensure a robust, user-friendly ecommerce platform that scales effectively.

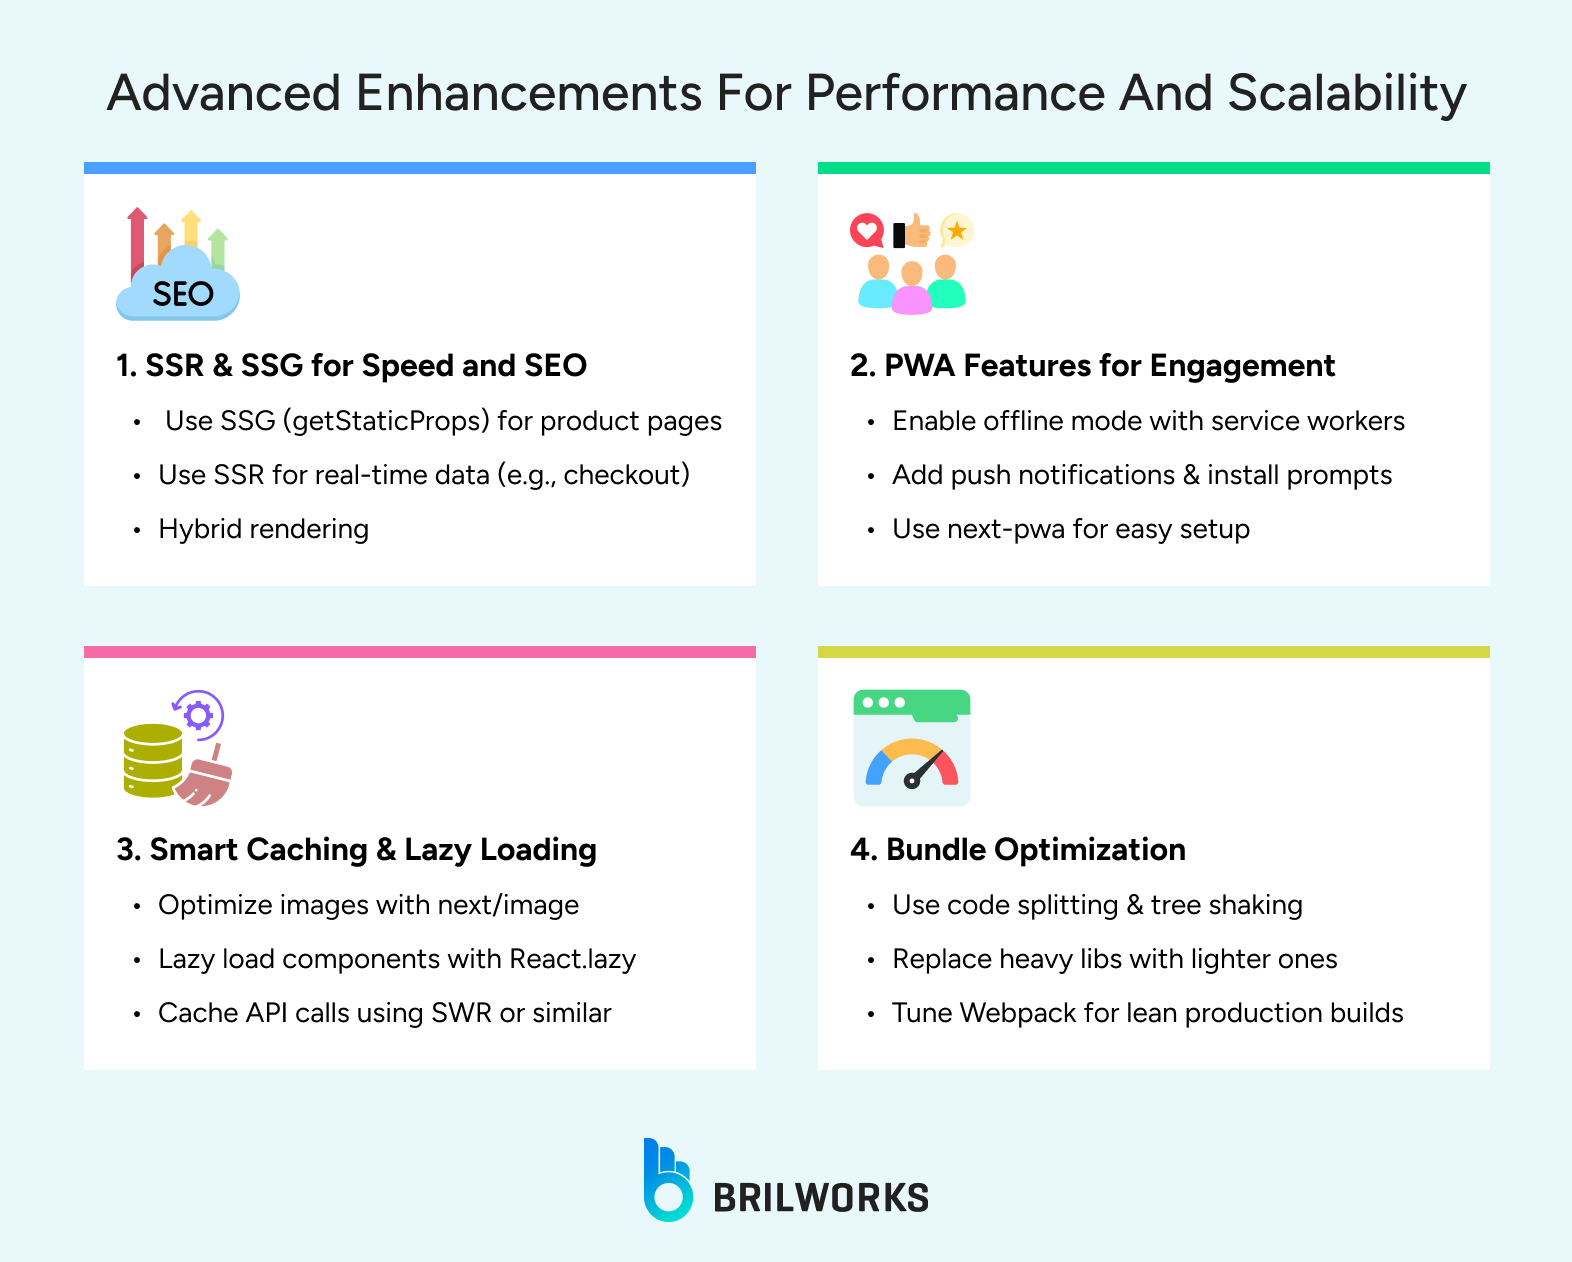
Next.js offers Server-Side Rendering (SSR) and Static Site Generation (SSG), both ideal for ecommerce.
SSR dynamically renders product pages on each request, ensuring fresh data for dynamic content like inventory.
SSG pre-renders pages at build time, perfect for static product listings with faster load times. Use getStaticProps for SSG:
export async function getStaticProps() {

const products = await fetchProducts();

return { props: { products } };

}
SSG improves SEO and initial load speed, while SSR suits real-time data needs.
A hybrid approach, SSG for product pages and SSR for checkout, optimizes performance and SEO.
Transform your React ecommerce platform into a Progressive Web App (PWA) using Next.js’s PWA support or workbox. Add a service worker to cache assets for offline browsing:
// next.config.js

const withPWA = require('next-pwa')({ dest: 'public' });

module.exports = withPWA({});
Implement push notifications for order updates and add installation prompts for an app-like experience, enhancing user engagement.
Optimize images with next/image for automatic resizing and lazy loading. Use React.lazy for component lazy loading:
const ProductList = React.lazy(() => import('./ProductList'));Cache API responses with libraries like swr and prefetch common paths to reduce load times, improving user experience.
Code splitting is a popular approach to reduce bundle size that you can do with React.lazy. You can eliminate code by enabling tree shaking, a method used for dead-code elimination in JavaScript programs.
Optimize external dependencies by using lightweight alternatives and configure Webpack for production builds to minimize JavaScript output.
export async function getStaticProps() {

const products = await fetchProducts();

return { props: { products } };

}

export default function ProductPage({ products }) {

return (

<div>

{products.map(product => (

<div key={product.id}>{product.name}</div>

))}

</div>

);

}
Here are some practical tips on how to optimize Reactjs apps’ performance.

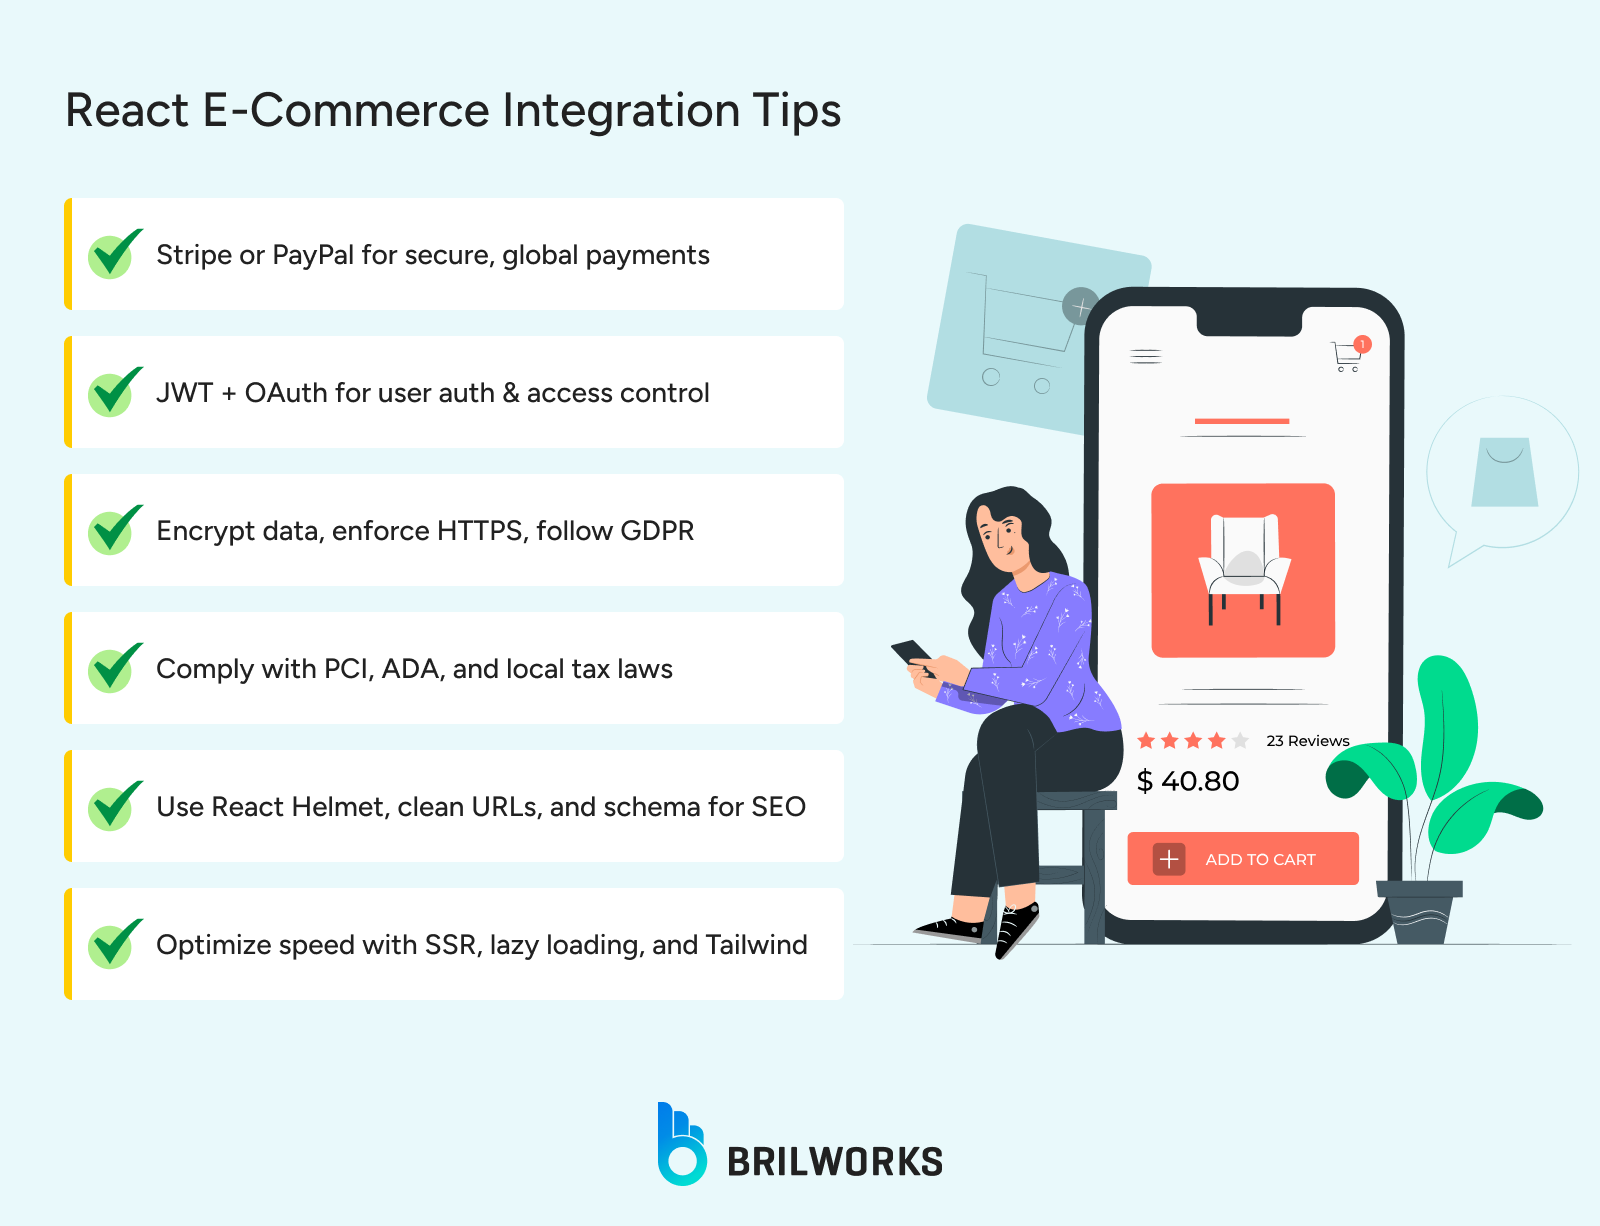
Select payment gateways like Stripe, PayPal, or Square based on integration ease and security. Stripe offers simple React libraries and robust international support. Assess fees, currency support, and PCI compliance. Test integrations in sandbox mode to ensure reliability.
For user management, secure authorization is crucial, and for this, you can implement role-based access. In addition, JWT-based authentication can be used for secure user sessions. You can use libraries like react-oauth2 for social login integration. Furthermore, role-based access is a great way to restrict admin features. Secure checkout routes with token verification to prevent unauthorized access.
Encrypt form inputs with HTTPS and store sensitive data (e.g., payment details) securely using server-side encryption. Comply with GDPR by minimizing data collection and anonymizing user data. Use libraries like crypto-js for client-side encryption where necessary.
Ensure PCI DSS compliance by using secure payment gateways. Implement GDPR by adding consent banners. For ADA accessibility, use ARIA attributes and test with screen readers. Address cross-border regulations by localizing payment and tax options.
import jwt from 'jsonwebtoken';

const authenticateUser = (user) => {

const token = jwt.sign({ id: user.id }, 'secret_key', { expiresIn: '1h' });

return token;

};

export default authenticateUser;SEO and responsive design are critical for React ecommerce success. Use React Helmet to manage dynamic meta tags:
import { Helmet } from 'react-helmet';

const ProductPage = ({ product }) => (

<>

<Helmet>

<title>{product.name} - My Store</title>

<meta name="description" content={product.description} />

</Helmet>

<div>{product.name}</div>

</>

);
Implement structured data with JSON-LD for product schemas to enhance search visibility.
Adopt a mobile-first design with Tailwind CSS, ensuring components adapt to all devices.
Optimize images with next/image for responsive loading. Monitor Core Web Vitals (e.g., LCP, CLS) to improve SEO and user experience.
Key SEO Factors for React Ecommerce:
Dynamic Meta Tags: Use React Helmet to set unique titles and descriptions for each product page.
URL Structure: Implement clean URLs with React Router (e.g., /products/:id).
Page Speed: Optimize with lazy loading and SSR to boost rankings.
Structured Data: Add product schemas to improve rich snippet visibility.
import { Helmet } from 'react-helmet';

const ProductPage = ({ product }) => (

<>

<Helmet>

<title>{product.name} - My Store</title>

<meta name="description" content={product.description} />

</Helmet>

<div>{product.name}</div>

</>

);

export default ProductPage;To grow a React ecommerce platform, implement A/B testing using tools like react-ab-test to optimize UI elements like CTAs.
Integrate analytics with Google Analytics or Mixpanel to track user behavior.
Monitor performance with Lighthouse to ensure fast load times.
Use personalization by leveraging user data to recommend products via React Context.
Optimize conversions with streamlined checkout flows and clear pricing.
Growth Tactics:
User Behavior Tracking: Use react-ga to track events like clicks and purchases.
Personalized Recommendations: Store user preferences in Context for tailored product suggestions.
Cart Abandonment: Implement email reminders with React notifications for incomplete checkouts.
Performance Metrics: Monitor Core Web Vitals to improve SEO and user retention.
import { Experiment, Variant } from 'react-ab-test';

const HomePage = () => (

<Experiment name="cta-test">

<Variant name="A">

<button>Buy Now</button>

</Variant>

<Variant name="B">

<button>Shop Now</button>

</Variant>

</Experiment>

);

export default HomePage;
React is one of the finest libraries for e-commerce development. Its component-based architecture is another good reason to choose the library for web application development. If you are looking for expert React developers for hire, we provide dedicated, vetted software developers on demand, helping business leaders onboard expert talents within 72 hours. React is flexible, and its capabilities can be extended with Next.js and Redux.
React’s Virtual DOM minimizes rendering updates, and its component-based architecture ensures efficient UI updates for fast, seamless ecommerce experiences.
Costs vary based on complexity, but React’s efficiency and reusable components often yield higher ROI compared to traditional platforms.
Yes, stores can be migrated using incremental refactoring or full rewrites, with Next.js easing the transition for SEO and performance.
React’s flexible components and CSS frameworks like Tailwind enable responsive designs that adapt seamlessly across devices.
Implement HTTPS, JWT authentication, and secure payment gateways to protect user data and transactions
Get In Touch
Contact us for your software development requirements
Get In Touch
Contact us for your software development requirements